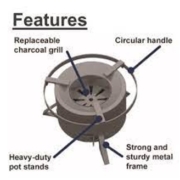
Secondary Air Jets in Charcoal Stoves?

Typical Charcoal Stove
Oorja FD TLUD

Charcoal stoves are batch loaded like TLUDs (top loaded up draft stoves), but they differ greatly in how air flow is used to encourage combustion. A charcoal stove has lots of primary air blowing up into the fuel. A TLUD uses a small amount of primary air to create a relatively constant amount of woodgas that is then combusted by a mixture of secondary air and flame above the fuel bed. The large amount of primary air in a charcoal stove tends to create the fire underneath the fuel, while the secondary air jets in a TLUD concentrate the fire above the batch of fuel.

If a TLUD allowed as much primary air as a charcoal stove into the bottom of the fuel bed, too much wood gas would be made and the TLUD would be smoky. I wonder if charcoal stoves could be patterned after TLUDs? Could a charcoal stove be top lit with jets of secondary air and flame on top of the batch of fuel? Would such an arrangement result in better performance? Would added secondary air in a charcoal stove maintain the fire on top of the fuel that would burn up the woodgas (predominantly CO in a charcoal stove)? Might this increase heat transfer efficiency since the temperatures (convection and radiation) might be hotter?

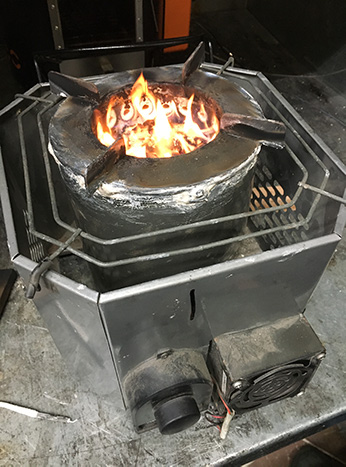
When Sam Bentson and Ryan Thompson studied how to improve charcoal stoves in the DOE 2011 project, they found that adding pre-heated natural draft jets of air did help to create more flame where it’s needed, right under the pot. Unfortunately, they also experienced that charcoal makes less flame than wood and covering the entire top of the fuel bed with flame (as in a TLUD) is difficult. Forced draft secondary air might be more successful, especially since charcoal stoves are usually short and do not generate needed velocities. To be most effective, the jets of air/fire should meet in the middle of the combustion chamber and cover the entire fuel bed. It seems to be best to use the minimum velocity necessary since too much air only cools the fire (Udeson, D.J., 2019, University of Washington).

We’ll try it and report on the results.

Charcoal Stove Design Principles (Ryan Thompson)

  1. Size the combustion chamber for the required task. Whatever fuel is loaded into the stove will be burned at a rate proportional to the amount of air made available to it. In most cases, more fuel means higher firepower because there is always excess air. For small amounts of food/water, where not much power is required, either load a small amount of fuel into the stove, or use a stove with a small combustion chamber. For cooking lots of food at once, use a stove with a big combustion chamber.
  2. Charcoal stoves can have a high turn-down ratio. If the primary air supplied to a charcoal fire is reduced close to zero, the fuel will still keep burning. When the air supply is increased, the firepower will also increase. Normally there is a spike in CO when the air supply is increased sharply, but it tends to stabilize once the firepower comes back up.
  3. Use pre-heated secondary air jets to burn up the CO. Most charcoal stove designs have air coming in from the bottom and sides of the fuel bowl. The air must pass through the burning charcoal before it gets to the top of the fuel where the CO is being emitted. If hot air is added above the charcoal, it is available to combust the CO. Try to keep the bottom of the batch of charcoal as cold as possible and burn down from the top of the batch of the fuel.
  4. Position the pot close to the charcoal. This maximizes heat transfer from radiation.
  5. Insulate the stove body. Insulate the stove body until a temperature of 620˚C or higher is achieved above the burning fuel. Insulation needs to be lightweight and trap still air. Examples of good insulation are: ceramic fiber, rock wool, wood ash, sheets of foil, etc.
  6. Use small channel gaps between the pot and the stove. The pot can be located very close to the top of the burning charcoal. A skirt with a 6mm channel gap around the pot helps increase the heat transfer efficiency from convection. Both convective and radiative heat transfer are important in a charcoal stove.
  7. Maintain a constant cross sectional area throughout the stove to start the design process and reduce as directed by experimentation under the emissions hood. This will help to keep the velocity of the draft as high as possible.
  8. Supply a large amount of primary air to assure sufficient firepower. Make the primary air door large enough to boil the water quickly. The door can be partially closed to reduce power when desired. The door has to be almost airtight to reduce firepower sufficiently when simmering in a pot with a lid.
Summertime_Solar_Cooking

Cooking With The Sun

Maria Telkes NYWTS
Summertime_Solar_Cooking


Last week we shared info about retained heat cooking. It’s frequently paired with solar cooking for feeding folks with no earth-generated fuel expenditure at all. But does it work? The cooks at ARC think that it’s great  – in the summer time when we have lots of sunlight.

Our preferred solar oven was invented in 1953 by Mária Telkes. She was a Hungarian-American biophysicist, scientist and inventor who became well known for her work in solar energy. Her many inventions also included a solar home heating system and solar powered water desalinator.

We like Telkes solar cookers that are big enough to generate firepower that is similar to wood burning cookstoves. A solar cooker is so easy to use and so much cleaner! Of course it is different because a Telkes solar cooker is an oven that is outside on the porch of the kitchen. The cook stands in the shade from the roof and the solar cooker basks in the sun. Just point it at the sun, put the food in the oven, and you are free to do everything else.

Here’s how we do the simple math to create a powerful Telkes solar cooker. Let’s say, as rules of thumb, that:

  1. There are about 250 BTUs in a square foot of sunshine per hour.
  2. There are approximately 8,600 BTU in a pound of wood. Remember, wood is stored solar energy.
  3. Therefore it takes a solar oven with about 34 square feet of intercepted sunlight to equal the cooking power of one pound of wood burned in an hour.
  4. In a solar oven with the firepower of one pound of wood (burned in an hour) the intercepted sunlight should be about 6′ by 6′. This is the measurement at the top edges of the solar reflectors – the widest part of the cooker.
  5. About 1/3 of the energy cooks the food and about 2/3rds of the energy is lost. 
  6. In our 6′ by 6′ solar oven, 3,000 BTUs would boil 2 gallons of water in about an hour. The light weight pot is black, it has a tight lid, the oven is well insulated, and airtight. The glass is double glazed. The losses are minimized and the solar gain is optimized with large reflectors on all sides. Large amounts of food can be made every sunny day without using up any earthly resources. 

In our experience, solar cookers are great when they are big enough to do the cooking task in a reasonable amount of time. ARC cooks have used them in the summer to cook lunch and dinner for 20 people and it’s nice to have a no-fuss oven that needs little tending. Solar cooking is certainly more comfortable when cooks don’t have to deal with a hot fire on summer days. At the Aprovecho farm, the staff have used stored solar energy in the winter (biomass) and direct solar energy (sunlight) in the summer for cooking, heating water, etc.

Of course, everything is dependent on sunlight.

Retained Heat Cooking

Use moisture proof insulation! Wet insulation doesn’t work well. Illustration from solarcooking.org 

While at ARC we focus on how to cook most efficiently with biomass, it is good to remember that some cooking can continue without consuming fuel. A retained heat cooker (RHC), also known as a Haybox, is a great way to save on fuel for appropriate cooking tasks such as simmering rice or beans.

How does a retained heat cooker (RHC) help when cooking? When food simmers, the fire replaces the constantly lost heat from the pot. If the heat were not lost but captured instead, then less fuel would be needed for cooking. Placing the pot of boiling food in an insulated container keeps the food hot enough to simmer it to completion. In the same way, a drafty and uninsulated house has to have a big fire in the heating stove going all the time to keep the house warm. Even if no fire is lit, the super-insulated, almost airtight house can stay warm for a long time.

After a pot of food boils, the contents are close to 100°C. When the hot pot is placed in a super-insulated, almost airtight box, the food finishes cooking, because the stored heat stays in the food. Once the pot is in the box, food cooks without further attention. The retained heat cooker, saves time, effort, and fuel, freeing the cook from long hours of watching the slow fire when simmering food.

Approximately 50% savings in time and fuel savings can be expected. The rice or stew won’t burn and the cook can make dessert! Because the fuel is only used for boiling food, cooking with a Haybox creates much less pollution, helping to clean up the air in the kitchen. In tests of 18 stoves, using a retained heat cooker reduced, on average, CO emissions by 56% and PM emissions by 37% . (Test Results of Cook Stove Performance, 2011)

RHCs have been used for hundreds of years. They can save time and effort that can be devoted to other tasks. The attraction begins with convenience. The fuel savings and decrease in harmful emissions add to the benefits of retained-heat cooking. More information on Hayboxes can be found in the EPA’s “Guide to Designing Retained Heat Cookers.

0.75 Constant Cross Sectional Area: A Winiarski “Rule of Thumb”

Uganda 2-pot rocket style stove

The Uganda 2-pot stove that is described on page 26 in the EPA publication “Test Results of Cook Stove Performance” is a natural draft stove that also uses much less fuel to cook and protects health. The document can be found at: https://nepis.epa.gov/Exe/ZyPURL.cgi?Dockey=P100EKU6.TXT.  Has it been a while since you looked at this book, a comparison of 18 cook stoves? The 2011 book started our surveys with the emissions hood and Test Kitchen, trying to quantify comparisons of fuel use and emissions from available stoves.

Dr. Nordica MacCarty’s paper with comparisons of 50 stoves is a much more complete survey. See: “Fuel use and emissions performance of fifty cooking stoves in the laboratory and related benchmarks of performance” (MacCarty, et al, 2010) https://www.sciencedirect.com/science/article/pii/S0973082610000311

The Uganda 2-pot stove has a Rocket combustion chamber. The hot gases made by the fire pass through narrow, insulated channels around the first pot, which is sunk into the stove. The gases then flow through an insulated tunnel and are forced into narrow channels around the second pot before exiting the chimney. The pots fit tightly into holes in the sheet metal top, preventing smoke from escaping into the kitchen. This stove is fast to boil and, because of the sunken pots, uses less wood than most stoves with chimneys. 

When we build and test stoves we often reflect on Larry Winiarski’s advice that helped to improve the Ugandan stove. Larry advised us that in a 2-pot horizontal stove, channel gaps around the pots that are 0.75 constant cross sectional area are a good compromise between maintaining needed draft and increasing heat transfer efficiency. The cross sectional area of the Ugandan fuel entrance in the Rocket combustion chamber was about 16 square inches so we made the channel gaps all the way to the chimney at 0.75 times 16 square inches. We use Larry’s “rule of thumb” and tests remind us how well Larry knew stoves. He had a good touch.

Constant cross sectional area through a cookstove.